
The Honeywell RTH6580WF is a Wi-Fi-enabled, 7-day programmable thermostat designed for smart home comfort․ It offers remote control, energy-saving features, and compatibility with most HVAC systems․
1․1 Overview of the RTH6580WF Model
The Honeywell RTH6580WF is a Wi-Fi-enabled, 7-day programmable thermostat designed for efficient home comfort․ It features smart response technology, remote access, and compatibility with most HVAC systems․ This model offers a user-friendly interface, scheduling capabilities, and energy-saving features․ The thermostat supports remote monitoring and control via the Honeywell Home app, allowing users to adjust settings from anywhere․ It is compatible with 24-volt heating and cooling systems, including heat pumps, gas, oil, and electric systems․ The RTH6580WF is part of Honeywell’s smart thermostat lineup, providing advanced functionality while maintaining ease of use․ Its compact design and intuitive navigation make it a popular choice for modern homes․
1․2 Key Features of the Wi-Fi Programmable Thermostat
The Honeywell RTH6580WF Wi-Fi programmable thermostat offers advanced features for smart home integration․ It includes 7-day scheduling, allowing users to set different temperatures for each day․ The thermostat supports Wi-Fi connectivity, enabling remote control and monitoring through the Honeywell Home app․ It also features Smart Response Technology, which learns the system’s performance to optimize heating and cooling․ Additionally, it provides alerts for system changes and maintenance reminders․ The thermostat is compatible with a wide range of HVAC systems, including heat pumps, gas, oil, and electric systems․ Its energy-saving features and intuitive design make it a versatile and efficient choice for home climate control․ The RTH6580WF is designed to enhance comfort while reducing energy consumption․
1․3 Importance of the Installation Manual
The installation manual for the Honeywell RTH6580WF is essential for ensuring proper setup and functionality․ It provides step-by-step instructions, safety precautions, and compatibility checks, ensuring the thermostat is installed correctly․ The manual also includes wiring diagrams and troubleshooting guides, helping users resolve common issues․ By following the manual, users can avoid installation errors that may lead to system malfunctions or safety hazards․ Additionally, the manual highlights energy-saving features and advanced settings, maximizing the thermostat’s efficiency․ Accessing the PDF version ensures easy navigation and reference, making it a vital resource for both professionals and DIY installers to achieve optimal performance and reliability from the thermostat․

Pre-Installation Requirements
Verify system compatibility, gather necessary tools, and ensure safety precautions are followed before starting the installation process of the Honeywell RTH6580WF thermostat․
2․1 System Compatibility Check
Before installation, ensure the Honeywell RTH6580WF is compatible with your HVAC system․ It works with 24-volt systems, including forced air, hydronic, heat pumps, oil, gas, and electric systems․ However, it is not compatible with millivolt systems (e․g․, gas fireplaces) or 120/240-volt systems․ Verify your system type and voltage to avoid installation issues․ Check the terminal connections and consult your existing system’s manual to confirm compatibility․ Proper system matching ensures optimal performance and safe operation of the thermostat․ If unsure, contact a professional or refer to Honeywell’s compatibility guide for clarification․
2․2 Tools and Materials Needed
For a successful installation of the Honeywell RTH6580WF thermostat, gather the following tools and materials: a screwdriver (Phillips and flathead), wire labels, a drill with bits, wall anchors, and a voltage tester․ Ensure you have the thermostat unit, wallplate, and mounting screws provided in the package․ Additionally, a laptop or smartphone with internet access is required for Wi-Fi setup․ Optional items include a level for precise mounting and a pencil for marking wire locations․ Always refer to the RTH6580WF installation manual for specific instructions․ Having all tools ready ensures a smooth and efficient installation process․
2․3 Safety Precautions
Before installing the Honeywell RTH6580WF thermostat, ensure the HVAC system’s power is turned off at the circuit breaker or fuse box to avoid electrical shocks or injuries․ Verify that the system is compatible with the thermostat, as it does not support millivolt or 120/240-volt systems․ Handle wires carefully to prevent damage or short circuits․ Always follow the RTH6580WF installation manual instructions and wear protective gear if necessary․ Ensure proper grounding to prevent electrical hazards․ If unsure, consult a licensed electrician․ Double-check the system type (e․g․, gas, oil, or electric) to ensure safe and correct installation․ Adhering to these precautions ensures a safe and successful setup․
Installation Process
The Honeywell RTH6580WF thermostat installation involves unpacking, preparing the device, understanding wiring, mounting, and connecting wires․ Refer to the RTH6580WF installation manual PDF for detailed steps․
3․1 Unpacking and Preparing the Thermostat
Begin by carefully unpacking the Honeywell RTH6580WF thermostat from its box․ Ensure all components, including the thermostat, wall plate, screws, and batteries, are included․ Handle the device gently to avoid damage․ Before installation, refer to the RTH6580WF installation manual PDF for specific instructions․ Separate the thermostat from the wallplate by grasping the finger holds on the top and bottom․ Ensure your system is compatible with the thermostat’s 24V requirements․ Turn off power to your HVAC system at the circuit breaker before starting the installation process․ This step is crucial for safety and proper preparation․
3․2 Understanding the Wiring Diagram
Understanding the wiring diagram is essential for a successful installation․ The RTH6580WF installation manual PDF provides a detailed wiring diagram specific to your system․ Identify the terminals (R, W, Y, G, C) and ensure compatibility with your HVAC system․ The thermostat is designed for 24V systems, excluding millivolt or 120/240V setups․ Match each wire to the correct terminal on the wall plate, following the diagram carefully․ If unsure, consult the manual or Honeywell’s support resources, such as videos or guides, to avoid errors․ Proper wiring ensures safe and efficient operation of your thermostat․
3․3 Mounting the Thermostat
Mounting the Honeywell RTH6580WF thermostat begins with removing the old thermostat and ensuring the power is off at the circuit breaker․ Attach the provided wall plate using screws, ideally into wall studs for stability․ If studs aren’t available, use wall anchors to secure the screws․ Snap the thermostat onto the wall plate using the tabs on its back․ Ensure the installation is level using a level tool to maintain accurate temperature readings․ After mounting, briefly test the thermostat to confirm the display lights up before proceeding with wiring․ Follow the manual’s instructions carefully to avoid installation errors and ensure proper function․
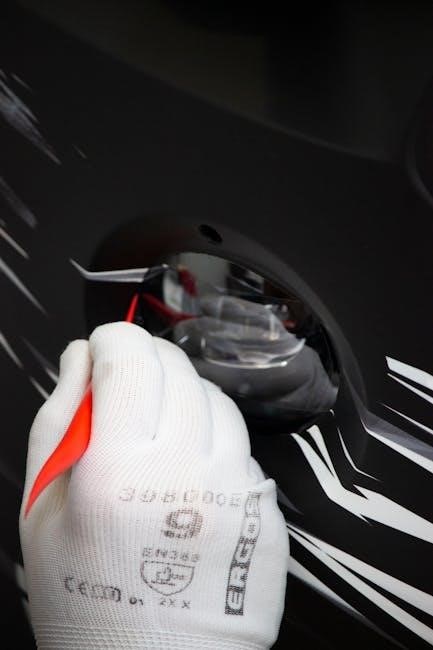
3․4 Connecting the Wires
Connecting the wires for the Honeywell RTH6580WF thermostat requires careful attention to ensure proper functionality․ Start by identifying each wire based on its color or label, typically corresponding to R (24V power), W (heating), Y (cooling), G (fan), and C (common)․ Refer to the manual to confirm terminal labels on the thermostat․ Before connecting, ensure the power is off at the circuit breaker to avoid electrical shock․ Match each wire to its respective terminal on the thermostat, securing them firmly․ If your system lacks a C wire, consider installing one or using a power extender kit for proper operation․ After connecting, turn the power back on and test the system to ensure all functions work correctly․ If issues arise, double-check each connection against the manual․
Initial Setup and Configuration
Power on the thermostat and follow on-screen prompts to set up Wi-Fi connectivity, register the device, and configure basic settings for initial operation․
4․1 Powering On the Thermostat
Once the thermostat is installed and connected, it should power on automatically․ If it doesn’t, ensure the HVAC system’s power is switched on at the circuit breaker․ A green LED will illuminate, indicating power․ Follow the on-screen setup wizard to complete the initial configuration․ If issues arise, refer to the manual or reset the device․ Proper power connection is crucial for functionality, especially for systems requiring a C-wire for continuous power․ Ensure all wires are securely connected to avoid malfunctions․ If the thermostat doesn’t turn on, check the power source and wiring connections․ Consult the manual for troubleshooting steps if needed․
4․2 Setting Up Wi-Fi Connectivity
To set up Wi-Fi connectivity for your Honeywell RTH6580WF thermostat, navigate to the network settings on the device․ Select your home Wi-Fi network from the available options and enter the password using the touchscreen interface․ Ensure your router is compatible with the thermostat’s Wi-Fi standards․ Once connected, a confirmation message will appear․ If pairing with the Honeywell Home app, follow in-app instructions to link your thermostat; If issues arise, such as a failed connection, restart the thermostat or check your router’s signal strength․ A stable internet connection is essential for remote access and smart features to function properly․ Refer to the manual for advanced troubleshooting steps if needed;
4․3 Registering the Device
Registering your Honeywell RTH6580WF thermostat is essential for remote access and smart features․ Begin by downloading and installing the Honeywell Home app on your smartphone or tablet․ Open the app and create an account by providing a valid email address and password․ Once logged in, select “Add Device” and follow the prompts to link your thermostat․ You may need to enter the thermostat’s ID, found in the device settings or the installation manual․ After successful registration, you’ll receive a confirmation email․ Ensure your device is connected to Wi-Fi for seamless communication․ Registration enables features like remote temperature control and custom notifications․ Refer to the manual for detailed steps or troubleshooting registration issues․
4․4 Configuring Basic Settings
After powering on and connecting to Wi-Fi, configure basic settings for optimal performance․ Navigate to the menu and set your preferred temperature range, ensuring it aligns with your HVAC system’s capabilities․ Choose between heating, cooling, or auto mode based on your needs․ Set the thermostat’s schedule, selecting pre-programmed templates or customizing a 7-day plan․ Adjust the temperature swing to balance comfort and energy efficiency․ Enable features like smart response, which learns your system’s behavior to pre-heat or cool․ Customize the display settings, such as brightness and units (Fahrenheit or Celsius), for convenience․ These configurations ensure your thermostat operates efficiently and meets your specific comfort requirements․
Programming and Scheduling
Program your Honeywell RTH6580WF thermostat with a 7-day schedule, setting temperature preferences for each day․ Utilize smart response technology for optimized heating and cooling efficiency automatically․
5․1 Creating a Weekly Schedule
The Honeywell RTH6580WF allows you to create a 7-day schedule, enabling you to set temperature preferences for each day of the week․ This feature ensures your home remains comfortable while optimizing energy usage․ You can program up to four periods per day, such as wake, leave, return, and sleep, with specific temperature settings for each․ The thermostat’s smart response technology learns your system’s performance and adjusts temperatures accordingly, providing efficient heating and cooling․ Use the menu navigation to customize your schedule, ensuring energy savings and consistent comfort throughout the day․
5․2 Setting Temperature Preferences
Setting temperature preferences on the Honeywell RTH6580WF is straightforward, allowing you to customize comfort levels for different times of the day․ The thermostat offers flexibility to adjust settings manually or through pre-programmed schedules․ You can set specific temperatures for heating and cooling modes, ensuring optimal comfort and energy efficiency․ The device also features smart response technology, which learns your system’s performance to pre-heat or cool your home, preventing temperature swings․ Additionally, the thermostat allows you to set temperature holds for temporary adjustments, providing convenience without disrupting your programmed schedule․ This ensures your home stays comfortable while optimizing energy usage based on your preferences․
5․3 Understanding Smart Response Technology
The Honeywell RTH6580WF features Smart Response Technology, which learns your HVAC system’s performance to optimize heating and cooling․ This advanced feature pre-heats or cools your home, preventing temperature swings and ensuring consistent comfort․ It adapts to your system’s capabilities, adjusting runtime and temperature setpoints for efficient operation․ Smart Response works seamlessly with programmed schedules, allowing the thermostat to anticipate and meet your temperature preferences․ This intelligent technology not only enhances comfort but also contributes to energy savings by minimizing unnecessary system runtime․ By leveraging historical data and system behavior, it ensures your home is always at the right temperature when you need it․
Advanced Features and Customization
The Honeywell RTH6580WF offers advanced features like Smart Response Technology and geofencing for energy efficiency․ Customize alerts, schedules, and settings to tailor your comfort and energy savings seamlessly․
6․1 Remote Access and Control
The Honeywell RTH6580WF thermostat allows seamless remote access and control through the Honeywell Home app․ Users can monitor and adjust temperature settings, view schedules, and receive notifications from anywhere․ This feature enhances convenience, enabling homeowners to optimize their comfort and energy usage on the go․ Remote control is particularly useful for adjusting settings before arriving home or responding to changes in the weather․ Compatibility with smart home systems further expands its functionality, offering integrated control and enhanced energy efficiency․ By leveraging remote capabilities, users can maintain optimal temperatures while reducing energy waste, making it a powerful tool for modern smart home management and optimization․
6․2 Energy Savings and Efficiency
The Honeywell RTH6580WF thermostat is designed to maximize energy savings through advanced features like Smart Response Technology․ This system learns your heating and cooling patterns to optimize efficiency․ The thermostat also supports geofencing, adjusting temperatures based on your location to avoid unnecessary energy use․ With programmable scheduling, you can set specific temperature preferences for different times of the day, reducing waste when no one is home․ Additionally, the energy usage dashboard provides insights into your consumption, helping you identify areas for improvement․ These features work together to lower utility bills and minimize environmental impact, ensuring your home remains comfortable while saving energy․ Regular updates and smart algorithms further enhance efficiency, making it a reliable choice for eco-conscious homeowners․
6․3 Customizing Alerts and Notifications
The Honeywell RTH6580WF thermostat allows users to customize alerts and notifications for enhanced convenience․ You can set temperature alerts to notify when the temperature exceeds your set range, ensuring comfort and preventing energy waste․ Maintenance reminders can be enabled to alert you when it’s time to replace filters or perform routine checks․ Additionally, system alerts inform you of issues like connectivity loss or sensor malfunctions․ These notifications can be delivered via email or through the Honeywell Home app, keeping you informed wherever you are․ Customizable alert settings provide flexibility, allowing you to tailor notifications to your specific needs and preferences, ensuring your system operates smoothly and efficiently without constant monitoring․ This feature enhances overall system management and peace of mind․

Troubleshooting Common Issues
This section helps resolve common issues like display malfunctions or connectivity problems․ Check wiring, ensure proper power, and verify Wi-Fi connection․ Consult the manual or Honeywell support for advanced troubleshooting․
7․1 Common Installation Mistakes
Common installation mistakes include incorrect wiring connections, improper system compatibility checks, and failure to turn off power before starting․ Ensure all wires match the wiring diagram and verify compatibility with your HVAC system․ Neglecting to follow the manual’s step-by-step guide can lead to issues․ Additionally, rushing through the process or ignoring safety precautions may result in malfunctions․ Always double-check connections and ensure the thermostat is properly mounted․ If unsure, consult the RTH6580WF installation manual or contact Honeywell support for assistance․ Correcting these errors early prevents future operational problems and ensures optimal performance of your thermostat․
7․2 Resolving Connectivity Problems
Connectivity issues with the Honeywell RTH6580WF often arise from incorrect Wi-Fi setup or router configuration․ Ensure the thermostat is connected to the correct network and the password is entered accurately․ Restart both the thermostat and router to refresh the connection․ Check for firmware updates, as outdated software can cause communication errors․ Verify that the thermostat is properly registered on the Honeywell Home app․ If issues persist, reset the thermostat to factory settings and repeat the setup process․ Refer to the RTH6580WF installation manual for detailed troubleshooting steps or contact Honeywell support for further assistance․ A stable connection is essential for remote functionality and optimal performance․
7․3 Addressing Display or Sensor Issues
If the display is unresponsive or shows incorrect information, ensure the thermostat is properly powered․ Clean the screen gently to remove dirt or moisture․ For sensor malfunctions, check the temperature calibration settings․ Verify that the sensor is not obstructed or exposed to direct sunlight․ If issues persist, perform a factory reset and reconfigure the device․ Ensure the thermostat is installed away from drafts or extreme temperatures․ Consult the RTH6580WF installation manual for recalibration instructions․ If problems remain, contact Honeywell customer support for potential sensor replacement or further diagnostics․ Accurate sensor function is crucial for reliable temperature control and energy efficiency․ Regular checks can prevent such issues from arising․

Maintenance and Upkeep
Regularly clean the display and ensure proper airflow around the thermostat․ Update firmware for optimal performance and schedule periodic system checks to ensure functionality and efficiency․
8․1 Cleaning the Thermostat
Cleaning the Honeywell RTH6580WF thermostat is essential for maintaining its performance․ Power off the device before cleaning to avoid damage․ Use a soft, dry cloth to wipe the display and exterior surfaces․ Avoid harsh chemicals or liquids, as they may damage the screen or internal components․ For stubborn stains, lightly dampen the cloth with water, but ensure it is not soaking wet․ Regular cleaning prevents dust buildup, which can affect temperature accuracy․ Additionally, check the thermostat’s air vents for dust or debris and clean them gently to ensure proper airflow and sensor functionality․ A clean thermostat ensures reliable operation and accurate temperature control․
8․2 Updating Firmware
Regular firmware updates ensure your Honeywell RTH6580WF thermostat operates with the latest features and improvements․ To update, connect the thermostat to your Wi-Fi network and navigate to the settings menu․ Select “Firmware Update” and follow on-screen instructions․ The thermostat will automatically check for and install available updates․ Do not turn off the device or disrupt the process, as this could cause issues․ Once updated, the thermostat will restart and be ready for use․ Firmware updates enhance performance, fix bugs, and add new functionalities, ensuring optimal energy management and smart home integration․ Always keep your thermostat updated for the best user experience․
8․3 Regular System Checks
Regular system checks are essential to ensure the Honeywell RTH6580WF thermostat operates efficiently and effectively․ Start by visually inspecting the wiring and connections to prevent loose or corroded contacts․ Clean the thermostat regularly to remove dust and debris that may interfere with sensor accuracy․ Check the battery levels if applicable and replace them as needed․ Additionally, verify that the thermostat is properly mounted and level to ensure accurate temperature readings․ Schedule periodic checks of the HVAC system to maintain compatibility and performance․ Regular maintenance helps prevent issues, optimizes energy usage, and extends the lifespan of your thermostat․ Always refer to the manual for specific guidance․
Additional Resources and Support
Visit Honeywell’s official website for the RTH6580WF PDF manual, customer support, and troubleshooting guides․ Contact Honeywell’s customer service at 1-800-468-1502 for assistance or visit their online forums for user discussions and solutions․
9․1 Accessing the PDF Manual
To access the RTH6580WF installation manual PDF, visit Honeywell’s official website or trusted platforms like Manua․ls․ The manual is available for free download, offering detailed installation guides, troubleshooting tips, and product specifications․ Ensure you have Adobe Reader installed to view the PDF․ The manual covers wiring diagrams, system compatibility, and step-by-step installation instructions․ It also includes sections on programming, Wi-Fi setup, and energy-saving features․ For additional convenience, Honeywell provides quick start guides and video tutorials on their support page․ Refer to the official Honeywell website for the most accurate and updated version of the RTH6580WF manual․
9․2 Online Support and Community Forums
Honeywell offers extensive online support for the RTH6580WF thermostat, including FAQs, troubleshooting guides, and community forums․ Visit Honeywell’s official website for access to these resources․ The online support page provides detailed answers to common questions and step-by-step solutions for installation and programming issues․ Additionally, community forums allow users to share experiences, ask questions, and receive tips from other RTH6580WF owners․ These platforms are valuable for resolving specific problems or learning about advanced features․ Honeywell’s online support ensures users can maximize their thermostat’s functionality and troubleshoot issues efficiently․ The forums are particularly helpful for gaining insights from experienced users․
9․3 Contacting Honeywell Customer Service
For direct assistance, users can contact Honeywell’s customer service team through various channels․ Visit Honeywell’s official website and navigate to the support section to find contact details․ The website provides phone numbers, email addresses, and live chat options for different regions; Customers can reach out for troubleshooting, installation guidance, or general inquiries․ Honeywell’s customer service is available to help resolve issues or provide clarification on specific features of the RTH6580WF thermostat․ For urgent matters, calling the dedicated support hotline is recommended․ Ensure to have your thermostat model number and purchase details ready for faster assistance․ Honeywell’s team is trained to address installation and operational queries effectively․
The Honeywell RTH6580WF thermostat offers ease of use, energy efficiency, and smart technology․ Proper installation ensures optimal performance․ Explore its features to maximize comfort and savings․
10․1 Summary of Key Steps
Installing the Honeywell RTH6580WF thermostat involves verifying system compatibility, gathering tools, and ensuring safety by turning off power․ Unpack and prepare the device, then mount it securely․ Connect wires according to the diagram, ensuring proper terminals are used․ Power on the thermostat and set up Wi-Fi connectivity․ Register the device and configure basic settings like temperature preferences․ Program schedules and explore smart features for energy efficiency․ Regular maintenance, such as cleaning and updating firmware, ensures optimal performance․ Troubleshoot common issues like connectivity problems or sensor malfunctions․ Always refer to the manual or Honeywell support for additional guidance․
10․2 Benefits of Proper Installation
Proper installation of the Honeywell RTH6580WF thermostat ensures optimal performance, energy efficiency, and system longevity․ It prevents potential issues like uneven heating, increased energy bills, or premature wear on HVAC components․ Correct wiring and setup guarantee precise temperature control, enhancing comfort and reducing operational costs․ Additionally, proper installation allows seamless integration with smart home systems, enabling remote monitoring and control․ It also ensures safety by adhering to electrical standards, minimizing risks of malfunctions or hazards․ By following the manual, users can maximize the thermostat’s features, enjoy reliable operation, and extend the lifespan of their HVAC system while maintaining a comfortable and energy-efficient home environment․
10․3 Encouragement for Further Exploration
Exploring beyond the basics of the Honeywell RTH6580WF thermostat can unlock its full potential․ Users are encouraged to delve into advanced features like Smart Response Technology and energy-saving modes to optimize their comfort and efficiency․ The thermostat’s compatibility with smart home systems offers additional customization options․ For those interested in troubleshooting or enhancing their setup, Honeywell provides extensive online resources, including manuals, videos, and community forums․ By taking the time to explore these tools and features, users can tailor their thermostat to meet their unique needs, ensuring a seamless and energy-efficient experience tailored to their lifestyle․